Scheduled Azure Container App Job Example


Azure Container App Jobs are designed to execute for a short period of time as part of your containerised workload in an Azure Container App Environment. They exist as separate entities from your Azure Container App but live in the same Azure Container App Environment to share resources. They can be triggered Manually, on a Scheduled basis, or be Event Driven. At the time of writing Azure Container App Jobs are in preview and are scaffolded using the Azure CLI.
In this blog post, we will look at a Scheduled Container Apps Job to run in the form of a simple .NET 7 Console App that gets data about rainfall stations from across the UK on a defined schedule. There will be no tie-in to a neighbouring Container App, this will focus solely on the Container App Job:
using Newtonsoft.Json;
///// ... ////

public static void Main(string[] args)
{
    HttpClient client = new HttpClient();
    var response =
    		client.GetStringAsync("http://environment.data.gov.uk/flood-monitoring/id/stations?parameter=rainfall");
    var data = JsonConvert.DeserializeObject<Rainfall>(response.Result.ToString());
    //arbitrary logic!!
    var filteredItems = data?.items
    .Where(item => item.gridReference != null && item.gridReference.Contains("SK"))
    .Select(item => new { item.gridReference, item._long, item.lat });

    foreach (var item in filteredItems)
    {
    	Console.WriteLine($"GridReference: {item.gridReference},
    					  Long: {item._long}, Lat: {item.lat}");
    }
}
Short program to get rainfall stations data from an API
public class Rainfall
{
    public string context { get; set; }
    public Meta meta { get; set; }
    public List<Item> items { get; set; }
}

public class Meta
{
    public string publisher { get; set; }
    public string licence { get; set; }
    public string documentation { get; set; }
    public string version { get; set; }
    public string comment { get; set; }
    public List<string> hasFormat { get; set; }
}

public class Item
{
    public string id { get; set; }
    public int easting { get; set; }
    public string gridReference { get; set; }
    public string label { get; set; }
    public double lat { get; set; }
    [JsonProperty("long")]
    public float _long { get; set; }
    public List<Measure> measures { get; set; }
    public int northing { get; set; }
    public string notation { get; set; }
    public string stationReference { get; set; }
    public string RLOIid { get; set; }
    public string catchmentName { get; set; }
    public string dateOpened { get; set; }
    public string riverName { get; set; }
    public string stageScale { get; set; }
    public string status { get; set; }
    public string town { get; set; }
    public string wiskiID { get; set; }
}

public class Measure
{
    public string id { get; set; }
    public string parameter { get; set; }
    public string parameterName { get; set; }
    public int period { get; set; }
    public string qualifier { get; set; }
    public string unitName { get; set; }
}
Classes to help deserialize the entire response JSON from the rainfall API
Publish to Azure Container Apps
Then we can publish the application to Azure Container Apps into an Azure Container Registry. I elected to build and publish with the use of the .NET SDK in Visual Studio 2022 which does not require Docker/Docker Desktop at all!!.
To make this sure this works at publish time, install the Microsoft.NET.Build.Containers Nuget Package:

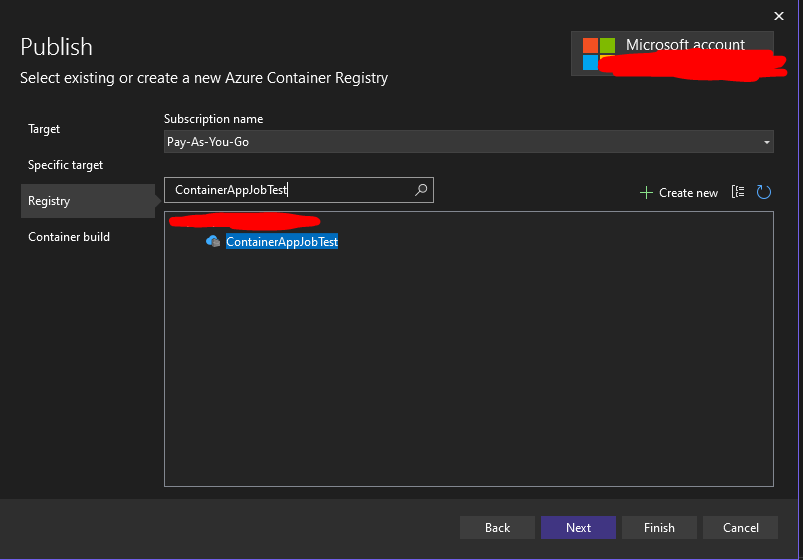
Next, Right-click the .NET7 project, Publish, Azure, Azure Container Registry. Then create a new instance of Azure Container Registry or select an existing one on your account:
Then click Next to select how to build and deploy the container image. In this blog post we will use .NET SDK:

Click Finish, then Publish.
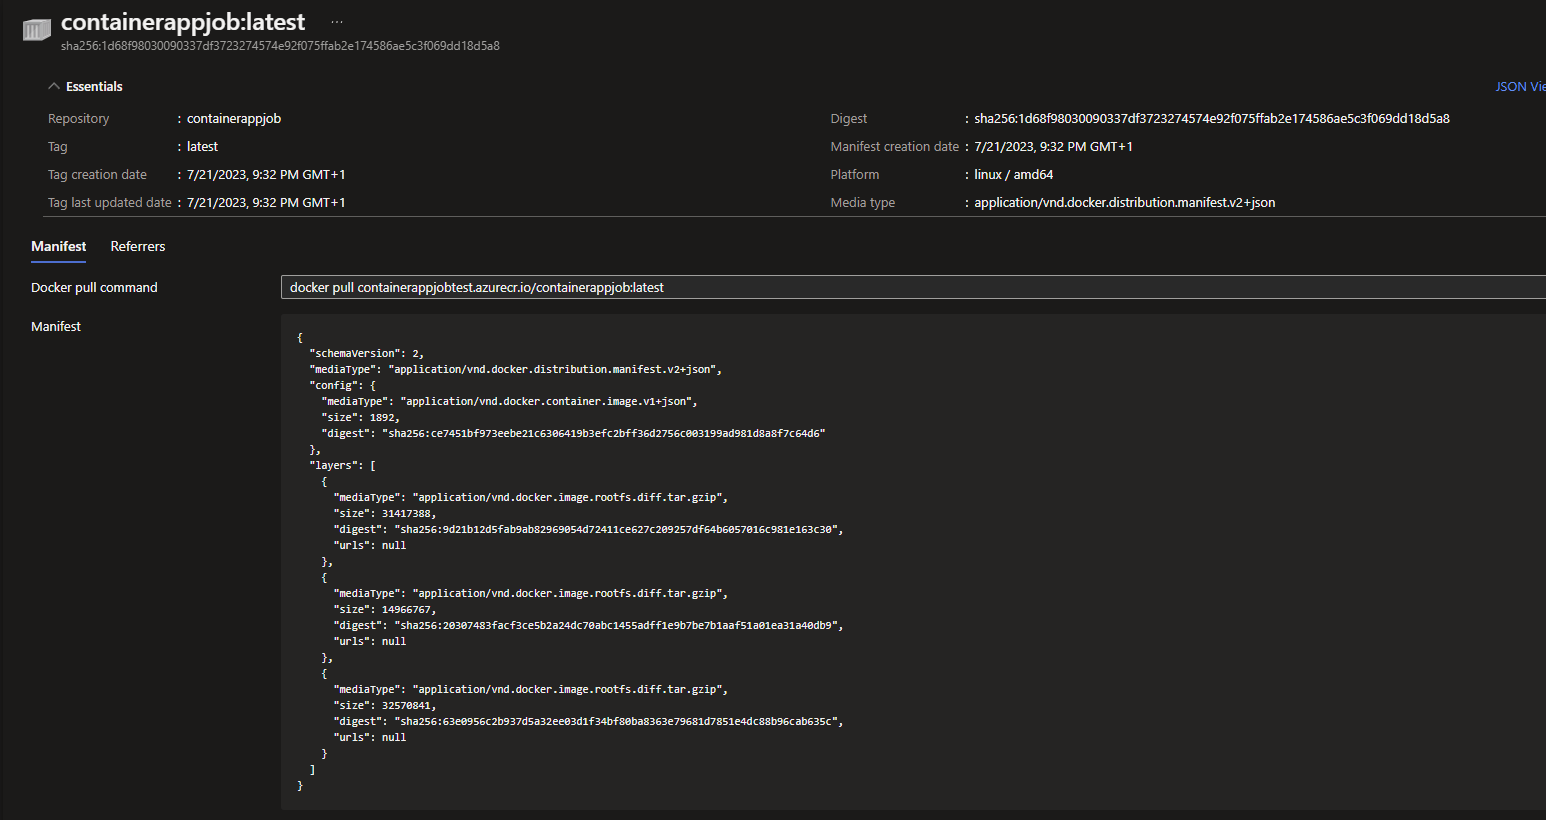
Check the deployment of your image into your Azure Container Registry from under the Repositories section in your Container Registry instance:
Create Azure Container Apps Environment with CLI
Next, run the following commands (ideally from Powershell) in this order where you login first, upgrade your CLI version and add the Azure CLI dependencies that are necessary:
az login
az upgrade
az extension add --name containerapp --upgrade
az provider register --namespace Microsoft.App
az provider register --namespace Microsoft.OperationalInsights
add CLI Dependencies
In the Powershell command window, define some variables that will be used for later. The location will ideally be the same location as our registry:
$RESOURCE_GROUP="yourResourceGroup"
$LOCATION="uksouth"
$ENVIRONMENT="env-jobs-test"
$JOB_NAME="my-test-job"
define variables. Note that some Locations are not available for Azure Container App Jobs such as ukwest, I used uksouth in my case
Next, we create a Container Apps Environment to securely separate the standard container app and the separate container app jobs that will need to share the same network. For simplicity, we will create this Container Apps Environment in the same Resource Group as our Container Registry:
az containerapp env create --name "$ENVIRONMENT" --resource-group "$RESOURCE_GROUP" --location "$LOCATION"When creating the Container Apps Environment you will notice the creation of a Log Analytics Workspace (since we didn't define one in the previous command):

After the Environment creation completes, we will create the Container Apps Scheduled Job with the following command, making sure that we replace the image reference with our own image reference from Azure Container Registry and also the registry server name. We may also want to customise the cron expression to suit our needs for how frequently the job executes:
az containerapp job create --name "$JOB_NAME" --resource-group "$RESOURCE_GROUP" --environment "$ENVIRONMENT" --trigger-type "Schedule" --replica-timeout 1800 --replica-retry-limit 1 --replica-completion-count 1 --parallelism 1 --image "[YOUR_FULL_IMAGE_REFERENCE]" --cpu "0.25" --memory "0.5Gi" --cron-expression "*/1 * * * *" --registry-server [YOUR_REGISTRY_SERVERNAME].azurecr.io --system-assigned --registry-identity systemThis command will also assign a role assignment to the Job to have AcrPull permissions on the Container Registry
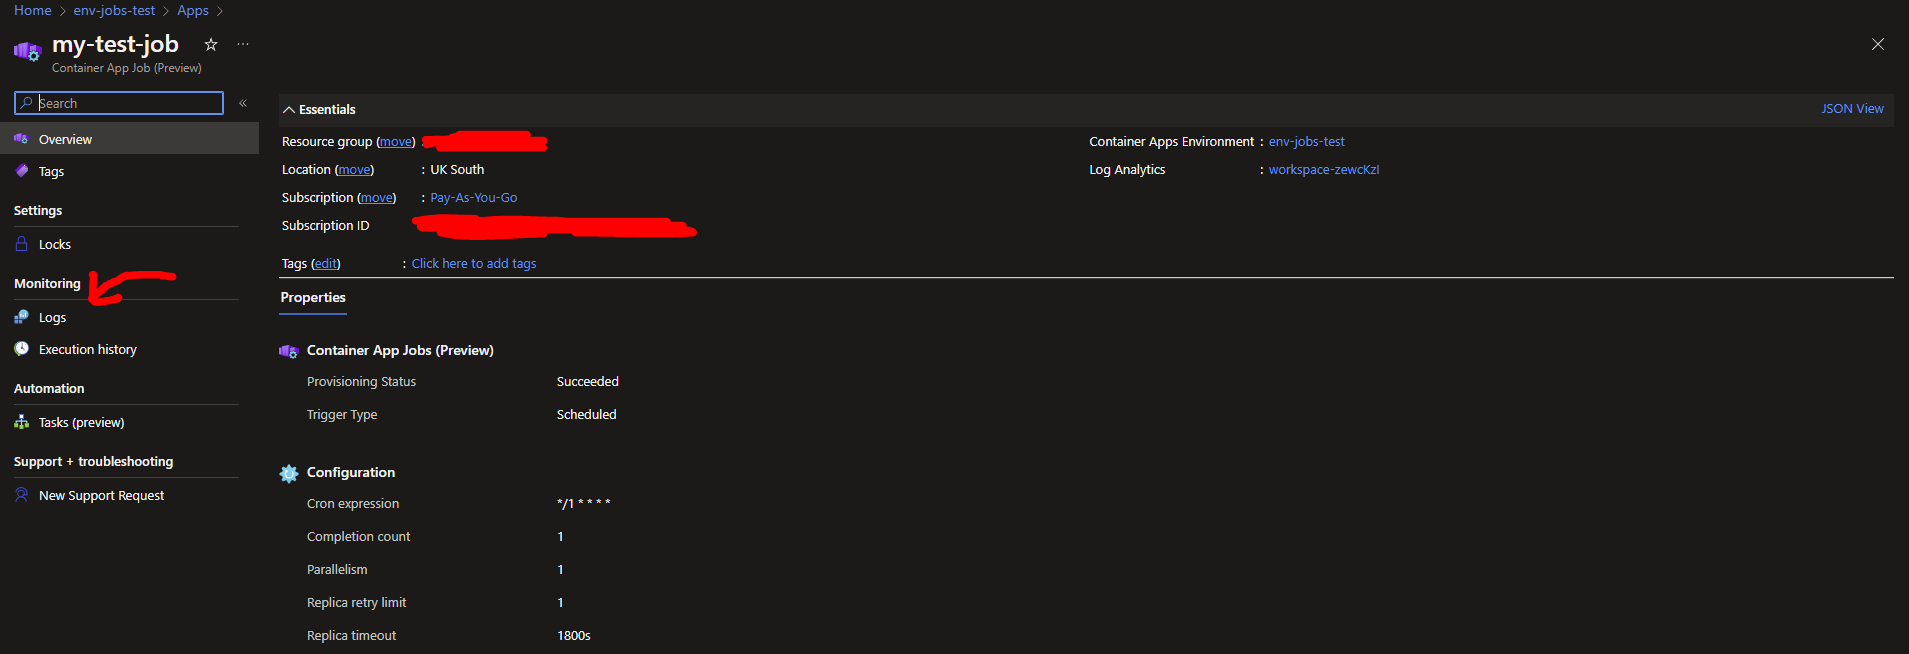
Azure Container App Job View
From the Azure portal and navigating into the Container App Environment instance we created, click on the "1" Next to Container App, then select your Container App Job. As you will see below, the schedule executes based on the CRON expression defined earlier.
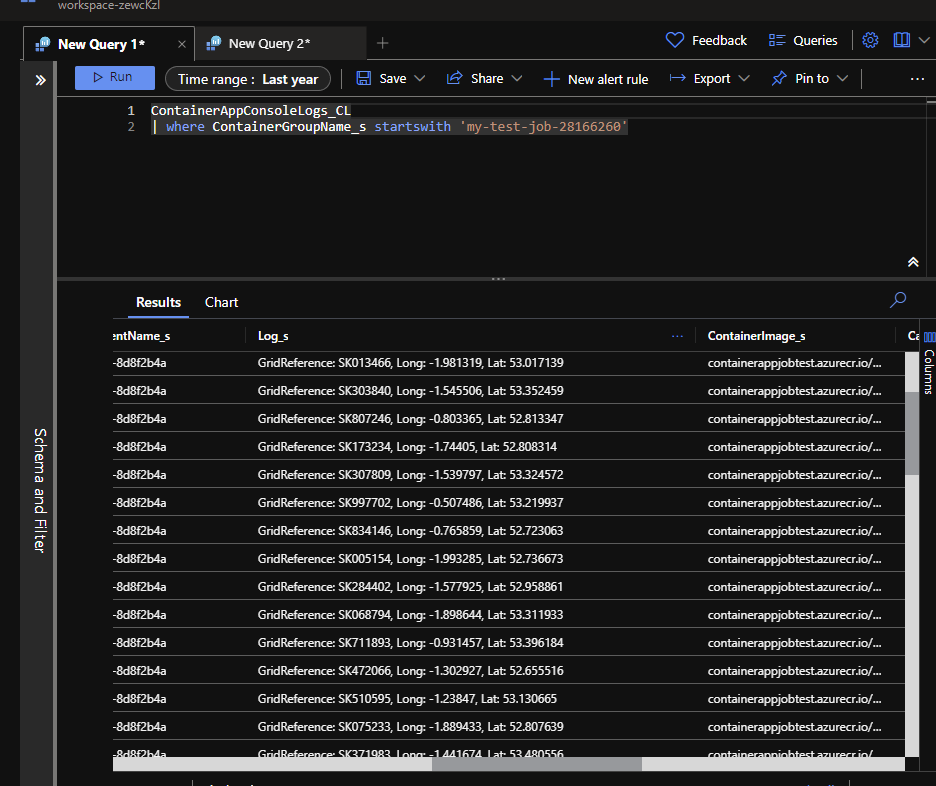
You will then see the following screen where you can now view the continuously printing logs from your code accessed from your container and logging results through the Logs in your Container App Job:
Conclusions
At the time of writing, this is preview software according to Microsoft so some processes and methods will likely change fairly soon. Additionally, when I was working through this and experimenting, I kept on having the sense that the role of Container Apps Jobs appears very similar to Timer Triggered Azure Functions in the case of Scheduled Container Apps Jobs, or simply the same as HTTP triggered Azure Functions in the case of Manual Container Apps Jobs.
In a production-level implementation, the App Jobs would work best in conjunction with a Container App handling a larger workload, with the App Jobs handling tasks such as traces, logging, and error reporting.