Azure Functions SQL Input Binding with Managed Identity Access


Azure Functions now have the ability to easily bind to a SQL Database for both Azure SQL Database and on premise. Previously, you would have needed to write custom code with a connection client inside the Function code itself to read and write to the database.
Not anymore. We will explore what this looks like now with an HTTP Triggered Function that has a SQL Input Binding (reading from SQL DB) and securely communicates with an Azure SQL Database via a Managed Identity in just 6 main steps. We will:
- Create an Azure Active Directory user to give us enough privilege to set the correct permissions for the Function App when the Function App communicates with the Database
- Create a SQL Server and SQL Database in Azure, set server configurations and add data to the database
- Publish the Azure Function App (this needs to use the v4 Functions runtime), and set a Managed Identity (a System Assigned Identity)
- Set the database permissions for the Function App using our AAD user
- Update the connection string for our Function and run it!!
- Remember to delete Azure resources after experimenting where applicable!!!
Create Azure Active Directory User
Over in Azure, first go to your Azure Active Directory resource and then choose Users from the left hand menu, then New User -> Create New User. Set the User Name, Name and a Password that you will keep for later, then click Create:
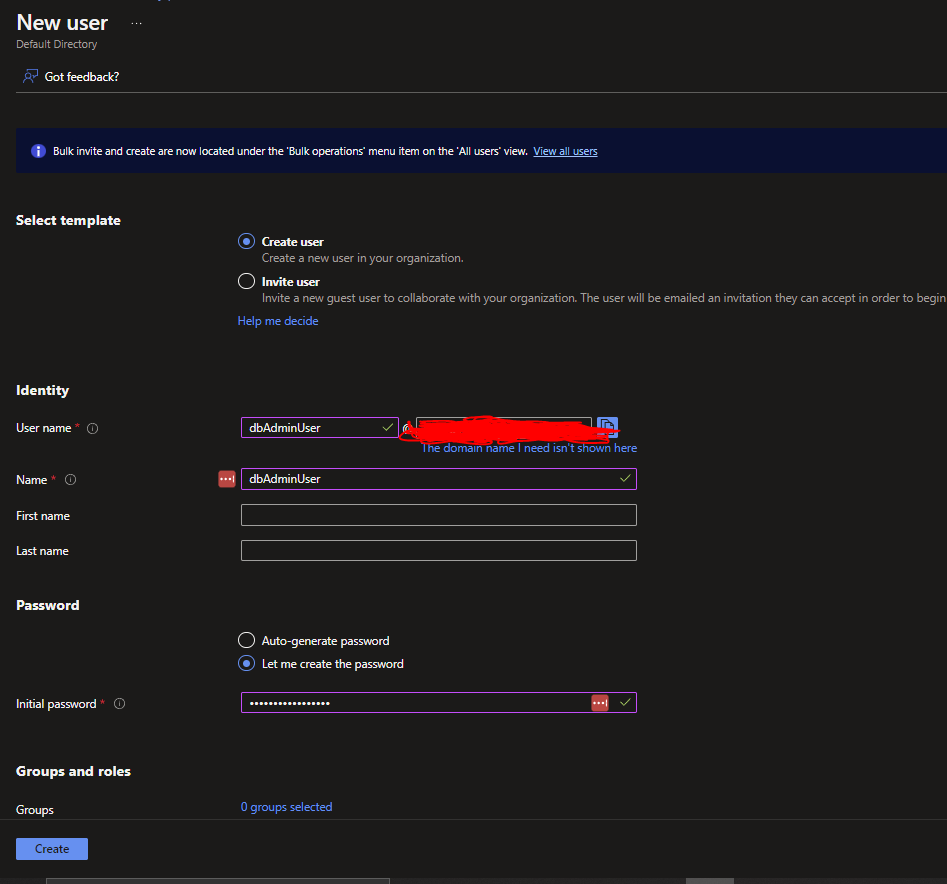
We will need these AAD user details in the 'Create a Database User for the Function App' section later.
Create SQL Server and Database
Now in Azure, create the SQL Server and SQL Database together. Start by creating an Azure SQL Database resource by searching 'SQL Database' from the top menu in Azure, then click Create.
Set the Resource Group and Database Name. Under Server, click Create new.
In the new panel that shows after, set your Server Name and Location (ideally close to you or your Users).
Set the Authentication Method to 'Use both SQL and Azure AD authentication'. Then click 'Set admin' and in the Right hand panel that comes up, search for the name of the Azure Active Directory User you created earlier to set this user as the Azure Active Directory admin.
Finally, set the SQL Server admin login and Password which will be separate from the AAD user details you set earlier. You should have a similar view for the Azure SQL Server creation panel as below:
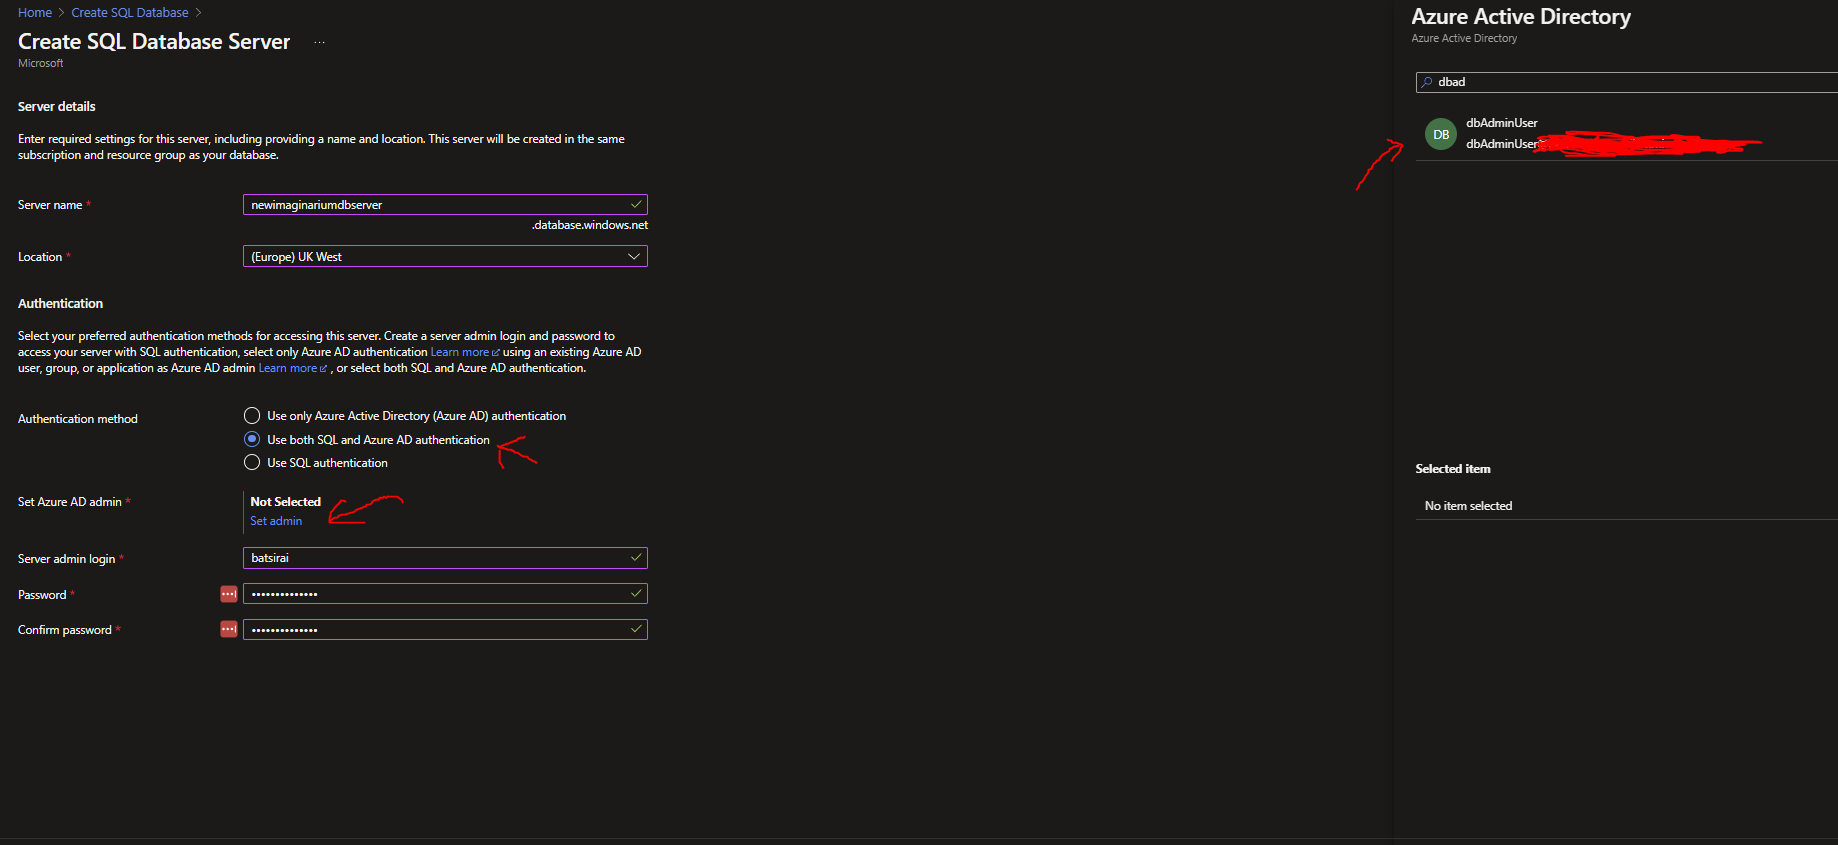
Click ok once the SQL Server Details are set.
On the SQL Database panel you are brought back to, continue to then set:
- No on SQL elastic Pool
- Development on Workload Environment
- General Purpose Serverless on Compute + Storage
- Locally redundant backup storage on Backup storage redundancy
The settings should help to minimise costs for development/experimentation. My monthly projected costs with these settings are £4.10. The config panel should look something like this:

If all is set, click Review + Create, then Create.
Configure SQL Server
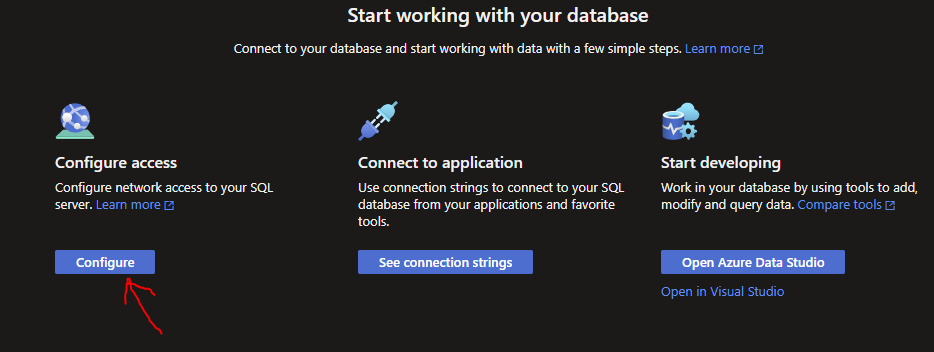
Once resources are created (Server and database), go to the newly created SQL Database resource, then click Overview from the left hand menu and click Configure from the Splash menu that shows in the Overview Menu of the SQL Database:
Select 'Selected Networks' to allow to you add your machine's IP address as an allowed IP to the SQL Server. Click 'Add your client IPv4 address' to add your machine. Select 'Allow Azure services and resources to access this server' then click Save:
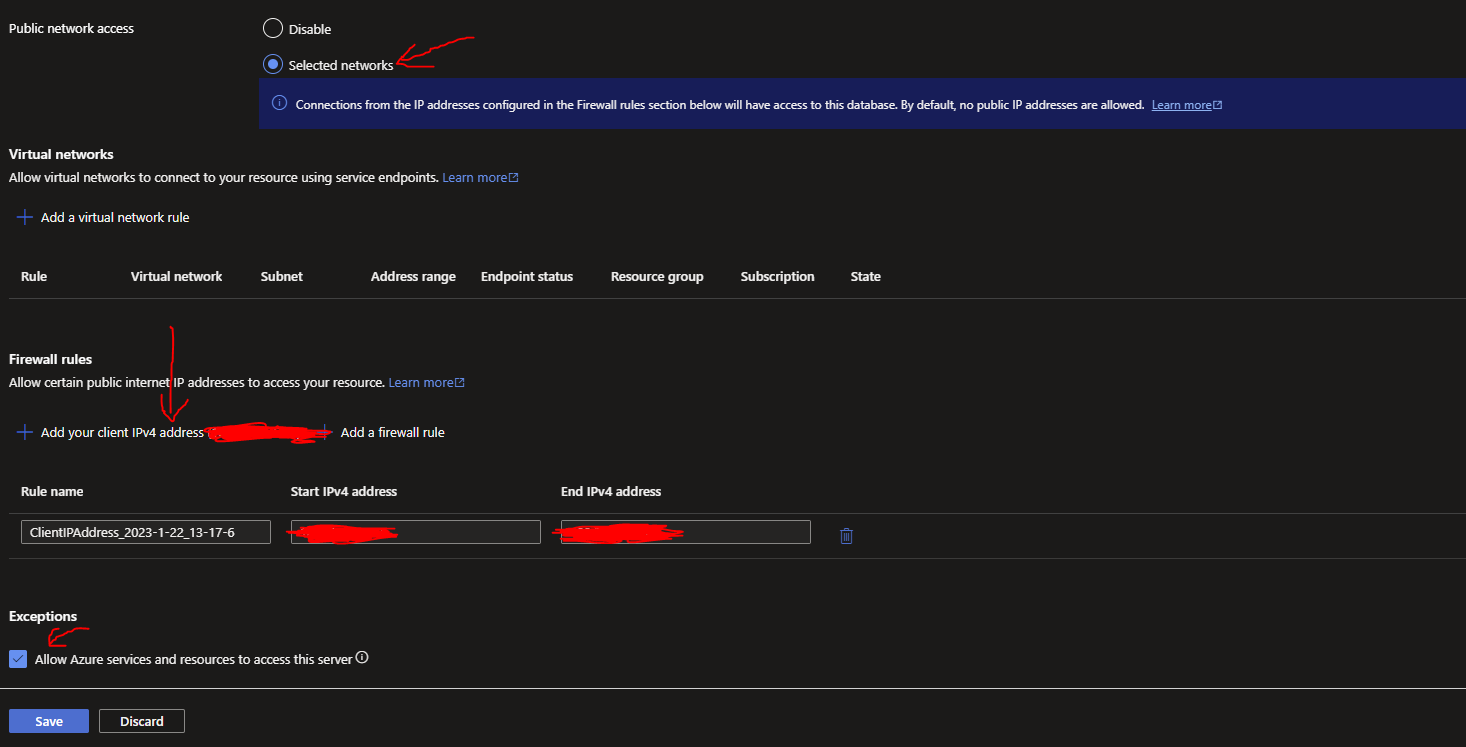
What we have set above will allow our machine to be allowed access to the SQL Server with tools like SQL Server Management Studio and will allow other Azure objects like our Azure Function. We have also allowed other Azure services to access the server (but not exactly with Managed Identity just yet, this comes later).
We are now ready create some data for the database.
Create some data for the SQL Database
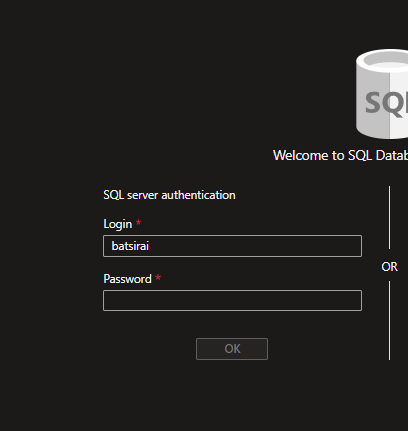
Now in your SQL Database resource, choose 'Query Editor' from the left hand menu and login with your SQL Server credentials you made earlier (ignore the Azure AD error that may appear on the right hand side):
In the Query window after logging in, you can use this script to create the Table and data (or any other table and data of your choice):
Your table and records should succeed creating after clicking Run in the Query Window:
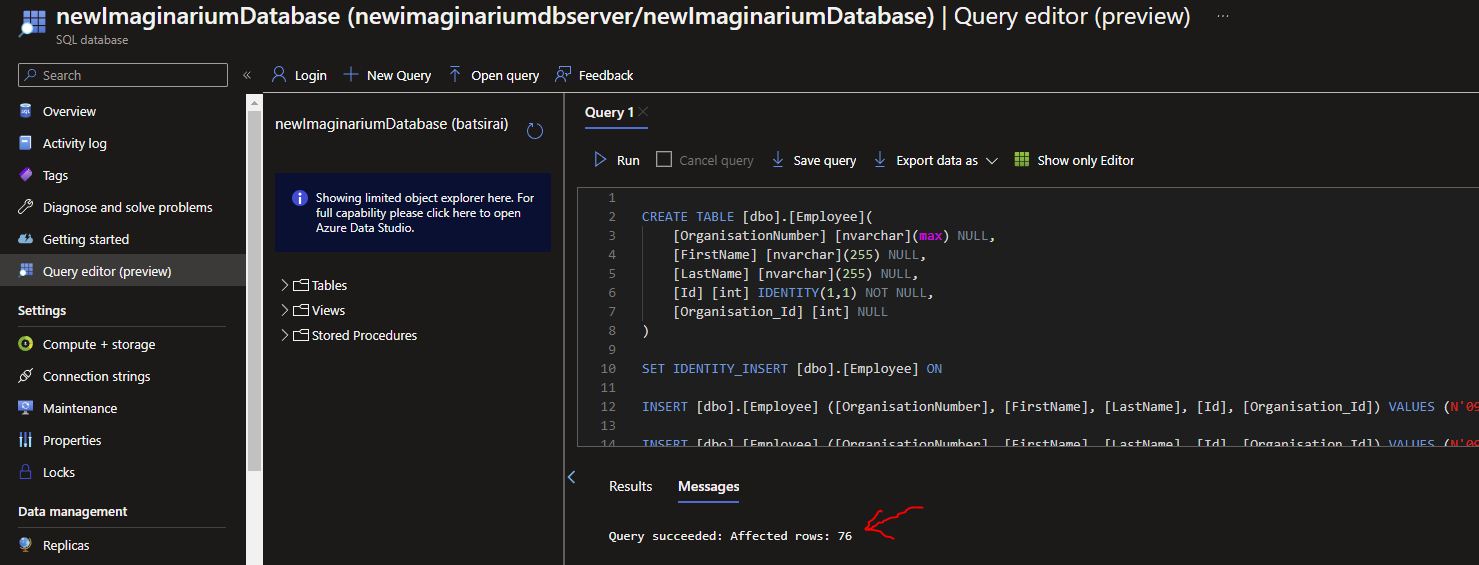
Our data is ready to be interacted with.
Publish an Azure Function
Here is a simple .NET6 HTTP triggered Function that has an input binding to a SQL Database:
public static class NewInputBinding
{
    [FunctionName("NewInputBinding")]
    public static IActionResult Run(
    [HttpTrigger(AuthorizationLevel.Function, "get", Route = null)] HttpRequest req,
    [Sql("SELECT *  FROM [dbo].[Employee] where Id > 41",
    CommandType = System.Data.CommandType.Text,
    ConnectionStringSetting = "newImaginariumDbConnString")] IEnumerable<Object> result,
    ILogger log)
    {
        log.LogInformation("Accessed SQL table in Azure Functions!!.");

        //manipulate records here, send alerts etc...
        //'result' is the output of the SQL statement
        string jsonData = JsonConvert.SerializeObject(result);
        List<EmployeeRecord> returnRecords =
                JsonConvert.DeserializeObject<List<EmployeeRecord>>(jsonData);

        //arbitrary logic!!
        foreach (var employee in returnRecords)
        {
            employee.PersonalAttribute =
            employee.Id % 4 == 0 ? "Great team motivator" : "Intuitive Observer";
        }

        //return modified results based on original SQL
        return new OkObjectResult(returnRecords);
    }
}public class EmployeeRecord
{
public string OrganisationNumber { get; set; }
public string FirstName { get; set; }
public string LastName { get; set; }
public int Id { get; set; }
public string Organisation_Id { get; set; }
public string PersonalAttribute { get; set; }
}The packages for this are as follows:
<Project Sdk="Microsoft.NET.Sdk">
  <PropertyGroup>
    <TargetFramework>net6.0</TargetFramework>
    <AzureFunctionsVersion>v4</AzureFunctionsVersion>
  </PropertyGroup>
  <ItemGroup>
    <PackageReference Include="Microsoft.Azure.WebJobs.Extensions.Sql" Version="0.1.457-preview" />
    <PackageReference Include="Microsoft.NET.Sdk.Functions" Version="4.1.1" />
  </ItemGroup>
  <ItemGroup>
    <None Update="host.json">
      <CopyToOutputDirectory>PreserveNewest</CopyToOutputDirectory>
    </None>
    <None Update="local.settings.json">
      <CopyToOutputDirectory>PreserveNewest</CopyToOutputDirectory>
      <CopyToPublishDirectory>Never</CopyToPublishDirectory>
    </None>
  </ItemGroup>
</Project>
Publish your Function App to Azure. In Visual Studio you can do this with Right Clicking the Function Project, Publish and following through the instructions for Azure.
For publishing, I'm using Visual Studio to publish the Function App to Azure under a Consumption Plan:

For easier management, note that we will publish the Function App without it explicitly knowing the connection string to the SQL database first and then we will update the connection string later. The Azure Function above is configured to look for a connection string App Setting called 'newImaginariumDbConnString'.
Set the Function App Managed Identity
In Azure, refresh your resources and go to the newly created Azure Function. Under the 'Identity' Menu, set the Status under System assigned tab to 'On', then click Save, then Yes:
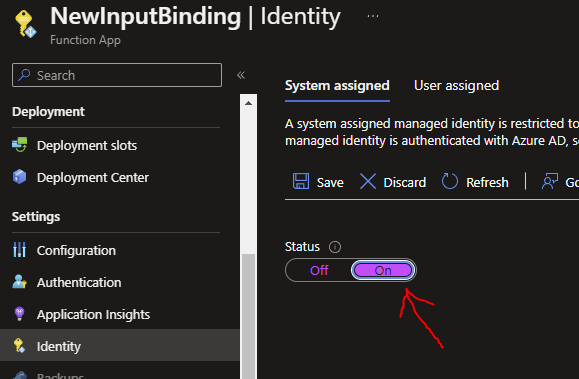
The Function can now access other resources in Azure such as our SQL server using a System Managed Identity and it has the Identity Name {yourFunctionAppName}. In my case, this name is 'NewInputBinding'. Doing this will help us connect to other resources more securely compared to having to use UserIds and Passwords
Create a Database User for the Function App
Using a tool like SQL Server Management Studio, login into your Azure SQL Database using the Azure Active Directory User you created earlier as this AD will be the user with enough permissions to execute the SQL command in our next step ('dbAdminUser' in my case):
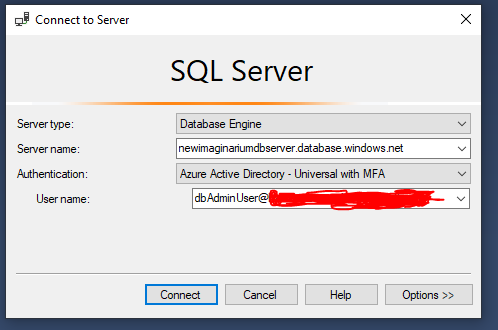
You can find your Server name from the Overview Screen of your SQL Database resource. You can find the full name of your AAD user in your Azure Active Directory resource -> Users-> {your user}.
When you log in, you will be asked to enter the AAD password for your AAD User. Then you will be asked to update the password for the AAD user. Update this, save it somewhere safe and continue.
Once connected, open a new query Window and execute the following SQL commands to add a Database User and to add Read and Write permissions (where 'NewInputBinding' is the name of your Function App in Azure):
CREATE USER [NewInputBinding] FROM EXTERNAL PROVIDER;
ALTER ROLE db_datareader ADD MEMBER [NewInputBinding];
ALTER ROLE db_datawriter ADD MEMBER [NewInputBinding];
GO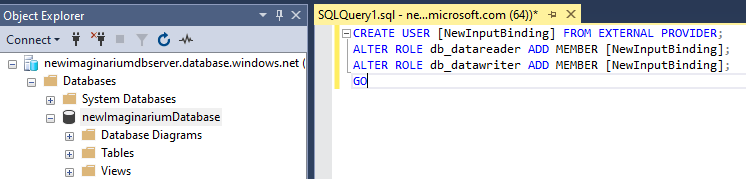
The execution of the commands should succeed.
Add/Update Azure Function App Connection String
The final step is next. Remember that we deployed the Function App without a specific connection string, just the alias that it should expect within the input binding.
Let's fix that. Now go to the Function App -> Configuration (from left hand menu), then under 'Connection strings', select New Connection string and add your connection string alias as it shows in your Function Input Binding (mine is 'newImaginariumDbConnString'). The value will be in the following 'Managed Identity' format which eliminates the need for a specific UserId and Password. The type will be SQLAzure:

Click Ok and then click Save and wait for the Save to finish.
Test the Function
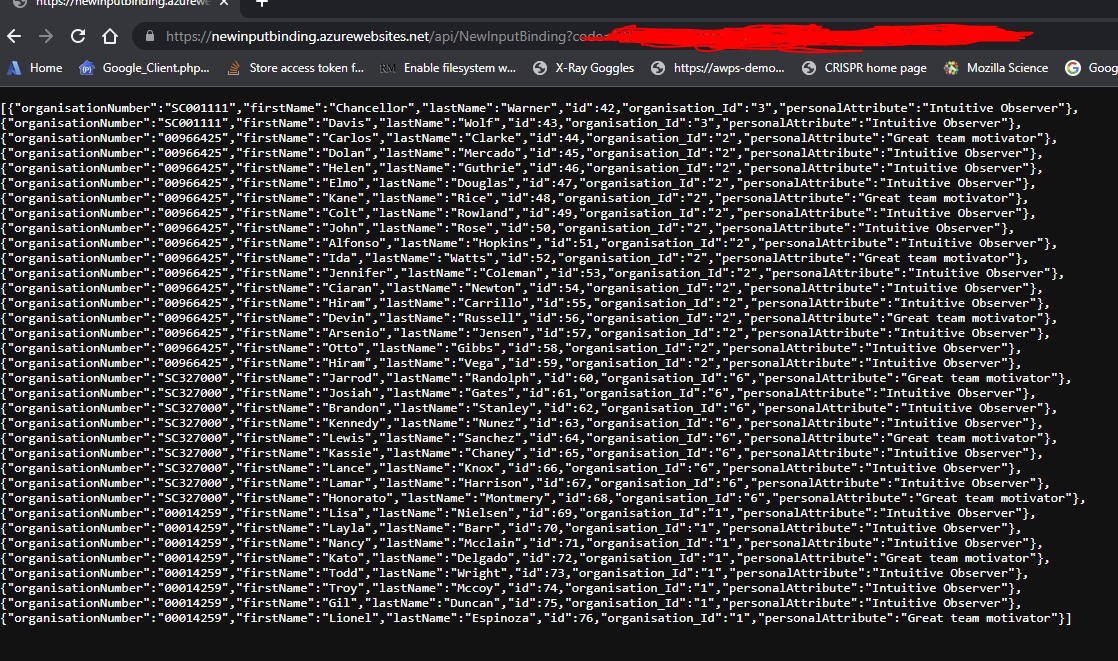
To be sure and safe, go back to the Overview of the Function App and click Restart.
Now find the Function Url from the left hand menu Functions Menu -> {yourFunction} -> Get FunctionUrl
In a separate browser Window, paste in your FunctionUrl and click Enter. You should see results from your SQL Database based on your Function code. Here is mine:
Conclusions
The SQL Input Binding saves us the legwork of having to write connection code to the SQL server and reading data from the Tables.
Although Function App Settings are encrypted at rest and in transit, Azure Key Vault is recommended and this would require reworking how the Function App accesses the connection string compared to accessing it from the Function method signature, which restricts it to only reading the exact text value of the App Setting in Azure.
REMEMBER, CLEAN UP YOUR RESOURCES. IT WILL BE A GOOD IDEA TO NOW DELETE THE AZURE SQL SERVER AND DATABASE!!!