Containerise a .NET app for Raspberry Pi

The following is a note on how I encapsulate an existing .NET 7 app for a Raspberry Pi 3b that uses a camera from a Docker container, with the use of Docker Desktop and Docker Hub.
I will assume that:
- you already have a Docker Hub Account,
- you have Docker Desktop installed
- you have a Private repository with an Access Token created for logging in into command line sessions. This can be created from the your Docker Hub Account under the Security Tab, then New Access Token
- you have the Docker runtime already installed/available on the target Raspberry Pi for pulling the image, creating the container and running it
The application itself is the application I originally built from the Overhead Project, but in short, the .NET application specifically will do the following:
- Listens for incoming messages on an Azure IoT hub
- Uses each message to trigger an image to be taken by a CSI v2 camera
- Using an Azure Custom Vision endpoint with a pre-trained image classification model, trained from my custom data, infers or predicts what the label is (or optionally Custom Vision running as a separate container locally on the Pi in Overhead Part 2).
- Send the inference result back to a known user as an SMS with Twilio
Here is the Docker file that builds my image from my build machine, yours will vary:
FROM mcr.microsoft.com/dotnet/runtime:7.0-bullseye-slim-arm32v7 AS base
VOLUME /home/pi/Arm32
VOLUME /opt/vc
ENV LD_LIBRARY_PATH="/opt/vc/lib:${LD_LIBRARY_PATH}"

WORKDIR /app

FROM mcr.microsoft.com/dotnet/sdk:7.0-bullseye-slim AS build
WORKDIR /src
COPY ["FirstCoreApp/FirstCoreApp.csproj", "FirstCoreApp/"]
RUN dotnet restore "FirstCoreApp/FirstCoreApp.csproj"


COPY . .
WORKDIR "/src/FirstCoreApp"
RUN dotnet build "FirstCoreApp.csproj" -c Release -o /app/build

FROM build AS publish
RUN dotnet publish "FirstCoreApp.csproj" -c Release -o /app/publish

FROM base AS final
WORKDIR /app
COPY --from=publish /app/publish .
ENTRYPOINT ["dotnet", "FirstCoreApp.dll"]
My Docker file
Note the following in my csproj file which are important to highlight:
<PlatformTarget>ARM</PlatformTarget>
<SelfContained>false</SelfContained>
<RuntimeIdentifier>linux-arm</RuntimeIdentifier>
Important configurations in the csproj file
In the csproj file, I set the RuntimeIdentifier for this app to linux-arm (which targets a Raspberry Pi). This keeps the docker image output size small so that we don't get a large folder of other platform runtimes that are unused such as windows and osx. We don't need to use Self-Contained mode because the .NET SDK and runtime are made available to us already within the image's base OS. And of course our PatformTarget is ARM.
From the command line and navigating to the solution folder level and placing the above Dockerfile at that level, I built the image first on my Windows 10 machine, with Docker Desktop running under Linux Containers:
docker build -t netapp .'netapp' is a custom name I set for my app, yours can be different
From Docker Desktop, this should create an ARM image that you will see as the following:

Next Login into your docker account from the Command Line with:
docker loginDocker login that should prompt logging in with your username and Access Token
This should allow you to login into your Docker Hub registry with your credentials we assumed at the beginning
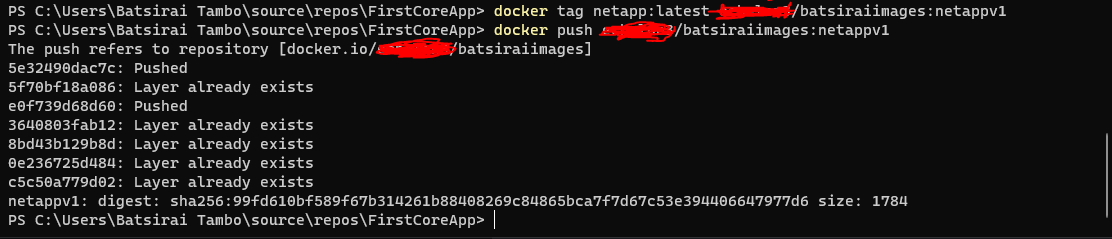
Then it's time to prepare and push the image to the Private image Repository (I used Docker Hub). This can be prepared with the following 2 commands:
docker tag {local-image:tagname} {your_dockerAccountName/your_RepoName:newtagname}
docker push {your_dockerAccountName/your_RepoName:newtagname}
Here you can customise 'newtagname' to your choosing, it can be different to the local tagname or kept the same
Here is my equivalent of the above:
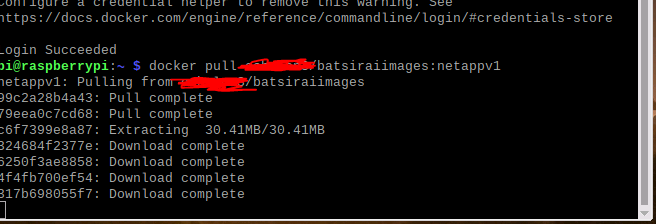
After this, it is a manner of pulling the image from the repository and creating a container on the target Raspberry Pi 3.
Now on the Raspberry Pi, login into your Docker account with docker login and use your existing token as the password.
Then run:
docker pull {yourdockerAccountName}/{yourdockerRepoName}:{yournewTagName}Docker pull from private repo example
Here is my equivalent of the above on the Raspberry Pi:
As standard for a very simple application, you can create and run a container of your newly downloaded and now local image by executing:
docker run {yourdockerAccount}/{yourdockerReponame}Docker run simplified example
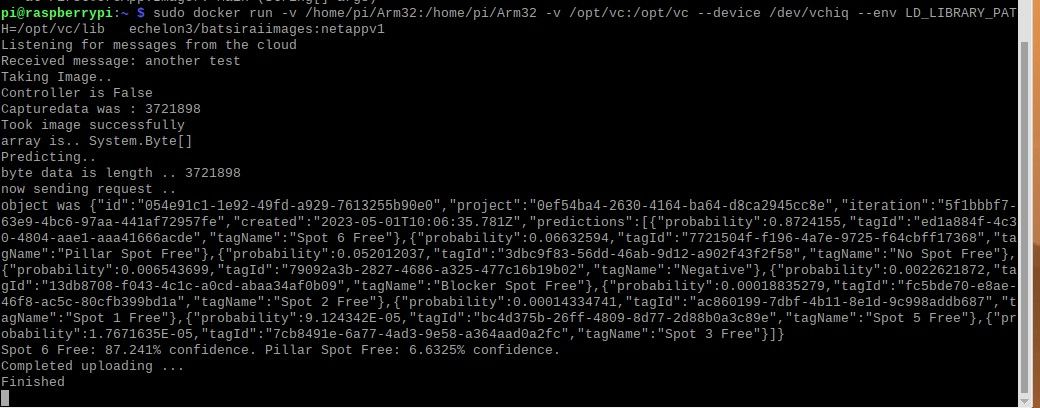
However for my particular scenario, my application running on a Raspberry Pi 3b depended on needing to mount to particular volumes in order to work properly and use an attached CSI camera correctly from a container. This is the docker command that I used for my application:
sudo docker run -v /home/pi/Arm32:/home/pi/Arm32 -v /opt/vc:/opt/vc --env LD_LIBRARY_PATH=/opt/vc/lib --device /dev/vchiq {mydockerusername}/batsiraiimages:netappv1
Mount volumes, specify an environment variable, give access to the mounted camera
In essence:
- The mount to the volume /home/pi/Arm32 is application-specific
- The mount to /opt/vc will make sure that when taking images from the app running in the container, all camera related dependencies will be available and no library reference errors will occur. My application uses the UnoSquare Raspberry Pi camera C# library, which in itself is a wrapper for the raspistill library that is found at /opt/vc/lib alongside other dependencies
- The environment variable LD_LIBRARY_PATH is for specifically instructing Linux to use the /opt/vc/lib directory, otherwise it is not used.
- The --device flag will give the container access to the attached camera
I truly hope this helps someone out there.
Thanks to Brandon Cannaday over at losant.com for providing helpful further reading on this topic, certainly helped me.